

Ever looked at freshly fallen snow and thought, “Hey, I could turn that into dessert”? If not, you’re in for a treat—literally! Snow ice cream is one of those magical winter traditions that turns a chilly day into a sweet, creamy experience. It’s fun, ridiculously easy to make, and you only need three ingredients!
I remember the first time I made snow ice cream as a kid. My mom handed me a bowl and sent me outside to scoop up the freshest snow I could find (with strict instructions to avoid the yellow stuff). We mixed in some vanilla and a can of sweetened condensed milk, and just like that—homemade ice cream, no machine required! I carry the tradition with my family every winter; it never gets old.
The best part? You can totally customize it! Want a dairy-free version? Swap out the condensed milk for coconut or almond milk. Craving chocolate? Add some cocoa powder or a drizzle of chocolate syrup. The possibilities are endless!
So grab a spoon and get ready, because I’m about to show you how to make the easiest snow ice cream recipe ever—perfect for cozy snow days, winter parties, or just because you feel like making something fun.
What Is Snow Ice Cream?
Think of it as Mother Nature’s soft serve—sweet, creamy, and made right in your backyard! Instead of churning for hours or messing with an ice cream maker, you mix fresh snow with simple ingredients and homemade ice cream in minutes.
Believe it or not, people have been making versions of snow ice cream for generations. Some say early settlers in America flavored fresh snow with sugar and milk, while others point to similar frozen treats enjoyed in various cultures worldwide. Either way, the idea is simple: if there’s fresh snow outside, there’s dessert waiting to happen!
The best part? It’s totally beginner-friendly. No fancy equipment, no complicated steps—just a big bowl, a spoon, and a little creativity. Plus, it’s fun to make the most of a snow day, whether teaching kids a new winter tradition or indulging in nostalgic, old-fashioned fun.
Ready to learn how to make ice cream with fresh snow? Let’s get started with the best snow ice cream recipe for winter fun!
Ingredients You’ll Need
Making homemade snow ice cream couldn’t be easier! All you need are three simple ingredients—plus any fun extras you want to throw in.
Basic Ingredients:
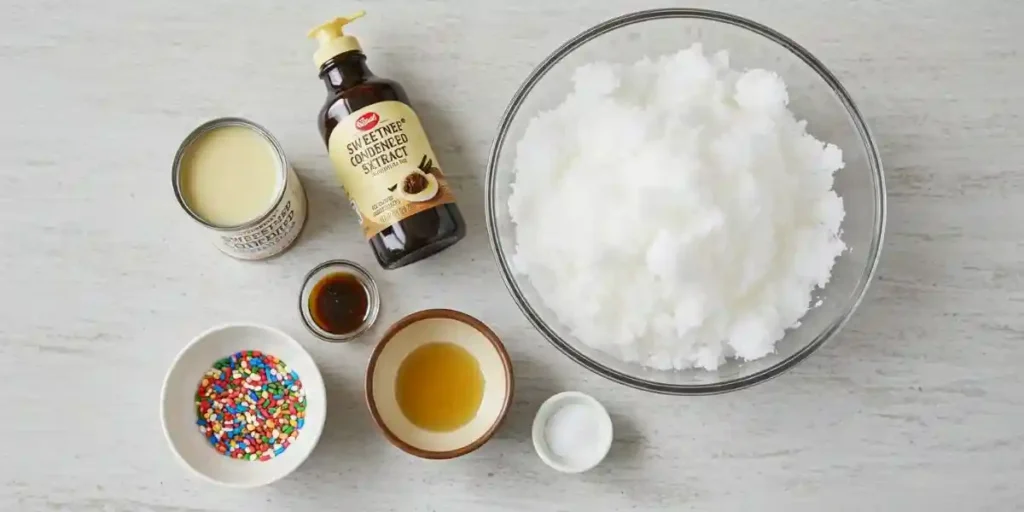
Fresh, clean snow – About 8-12 cups (light, fluffy, and unpacked).
Sweetened condensed milk – Gives it that rich, creamy texture. Don’t have any? No worries! You can use regular milk + sugar instead.
Vanilla extract – Adds that classic ice cream flavor, but feel free to experiment with almond, peppermint, or even maple extract for a twist!
Optional Mix-ins (Because Why Not?)
Feeling fancy? Try these fun add-ins:
Chocolate syrup – For a rich, fudgy flavor.
Sprinkles – Because everything’s better with sprinkles!
Crushed cookies or smog balls candy – Oreos, Reese’s, or crushed peppermint.
But Wait… Is It Safe to Eat Snow?
Good question! If you’re worried about using snow, just stick to freshly fallen, untouched snow—and obviously, avoid anything that’s been sitting too long or has a suspicious tint (looking at you, yellow snow). If you’re extra cautious, collect it in a clean bowl as it falls.
Now that you’ve got your simple homemade snow ice cream ingredients, let’s learn how to make snow cream with condensed milk!
Step-by-Step Instructions: How to Make Snow Ice Cream
Ready to turn that fresh snowfall into a sweet, creamy treat? Follow these simple steps to whip up the perfect bowl of homemade snow ice cream in minutes!
Step 1: Gather Your Snow
Fresh is best! Aim for light, fluffy, freshly fallen snow. It won’t give you that soft, creamy texture if packed, icy, or slushy.
Pro Tip: Set a clean bowl outside while snowing to collect the freshest, untouched snow!
Step 2: Add Vanilla & Sweetened Condensed Milk
Pour 1 teaspoon of vanilla extract over the snow. Then, slowly drizzle 1 can (14 oz) of sweetened condensed milk over the top. Don’t just dump it all in one spot—you want even coverage, not a sugary puddle at the bottom.
Alternative: No condensed milk? No problem! Use 1 cup of milk + ½ cup sugar instead.
Step 3: Mix Gently
It’s time to mix! Use a wooden spoon or spatula to fold everything together gently. Think of it like making a snow angel—light and airy, not heavy-handed. Overmixing can make it dense and slushy.
Step 4: Adjust the Consistency
If your mixture is too runny, just add a little more snow.
If it’s too thick, just add a splash of milk to smooth it out.
The goal? A smooth, scoopable texture—just like soft-serve ice cream!
Step 5: Serve Immediately & Enjoy!
Snow ice cream melts faster than regular ice cream, so don’t wait! Scoop it into bowls, top it with sprinkles, chocolate syrup, or crushed cookies, and dig in!
Bonus Tip: Want to get creative? Try different flavors like chocolate (add cocoa powder) or strawberry (blend in fresh berries)!
Now you know exactly how to make snow ice cream at home—so grab a spoon and enjoy a bowl of wintery goodness!
Tips & Variations: Make Your Snow Ice Cream Even Better!
Want to take your homemade snow ice cream to the next level? Try these flavor swaps, dairy-free alternatives, and fun mix-ins to make it your own!
Flavor Swaps
Not a vanilla fan? No problem! Switch things up with:
- Chocolate: Stir in 2 tablespoons of cocoa powder for a rich twist.
- Caramel: A drizzle of caramel sauce makes it extra indulgent.
- Peppermint: Add a few drops of peppermint extract for a wintery, cool flavor.
- Strawberry: Blend in fresh strawberries or a spoonful of strawberry jam!
Dairy-Free Options
Want a dairy-free snow ice cream recipe? Try these swaps:
- Coconut milk (full-fat for extra creaminess)
- Almond milk + a little maple syrup or sugar
- Oat milk + a splash of vanilla extract
Pro Tip: Sweetened non-dairy creamers work great too for a rich, smooth texture!
Mix-Ins & Toppings
Want to add some crunch or extra flavor? Try these fun mix-ins:
- Crushed Oreos (cookies & cream vibes!)
- Cinnamon (for a cozy, spiced twist)
- Rainbow sprinkles (Because a little sparkle makes everything shine!)
- Hot fudge or caramel drizzle (yes, please!)
- Mini marshmallows (s’mores-inspired deliciousness)
Storage Tips
Can you freeze snow ice cream? Yes! But keep in mind:
- It hardens up a lot in the freezer. Let it sit at room temp for 10-15 minutes before scooping.
- Stir in a splash of milk to soften it back up.
- Best enjoyed fresh, but if you must store it, keep it in an airtight container for up to 24 hours.
Now that you know the best mix-ins for homemade snow ice cream, it’s time to get creative! What flavors will you try first?
Nutritional Information & Moderation Tips
While snow ice cream is a fun and simple treat, it’s still a dessert—so a little moderation goes a long way! Here’s what you should know before digging in:
Estimated Nutritional Breakdown (Per Serving)
(Values may vary based on ingredients used.)
- Calories: ~150-200
- Fat: 5-8g
- Sugar: 15-25g
- Protein: 2-4g
If you’re watching your sugar intake, try using a sugar substitute like stevia or monk fruit sweetener. For a lower-fat option, swap sweetened condensed milk for almond or coconut milk with a touch of honey.
Dietary Considerations & Allergies
Dairy-Free? Swap in coconut milk or oat milk for a creamy twist.
Keto-Friendly? Try heavy cream with a low-carb sweetener.
Diabetic-Friendly? Stick to unsweetened almond milk and a sugar alternative.
Disclaimer: Always check with your doctor if you have specific dietary concerns, especially regarding sugar and dairy consumption.
How to Make Snow Ice Cream Without Snow
Do you love the idea of snow ice cream but live in a place where winter never arrives? With a few easy swaps, you can still enjoy this fun treat!
Shaved Ice Method
Closest to the real thing!
- Use a blender or food processor to crush ice into a fine, fluffy texture.
- Follow the same steps as the original recipe, mixing sweetened condensed milk and vanilla.
Blended Ice Method
For a smoother texture!
- Blend ice cubes with some milk until it reaches a slushy consistency.
- Stir in vanilla extract and sweetener to taste.
Frozen Milk Method
For a creamier alternative!
- Freeze milk (dairy or non-dairy) in ice cube trays.
- Blend until smooth and mix in your favorite flavorings.
Bonus Tip: Add cornstarch (about ½ teaspoon) to thicken the texture and mimic the fluffy feel of real snow!
FAQs & Troubleshooting: Solve Your Snow Ice Cream Woes!
Got questions? No worries—I’ve got answers! Here’s everything you need to know about making the best homemade snow ice cream.
Is It Safe to Eat Snow? Environmental & Safety Tips
Snow ice cream is a fun winter treat, but before you start scooping up snow, it’s important to consider safety and environmental factors. Here’s what you need to know:
How to Choose Clean Snow
Go for Fresh Snow – The best time to collect snow is after a fresh snowfall. Avoid snow that has been sitting for too long.
Scoop from the Top – Don’t gather snow from the ground or near roads and sidewalks where it may have picked up dirt, salt, or chemicals.
Avoid Discolored Snow – It may seem obvious, but stick to pure white snow. Any yellow, brown, or pinkish hues are a big no-go!
Consider Location – Urban areas with high pollution may have contaminants in the air that can settle in the snow. If you live in a city, skipping making snow ice cream or using an alternative method may be best.
Environmental Factors to Keep in Mind
Air Pollution Concerns: Snow can trap pollutants from the atmosphere, so if you live in an area with heavy smog, it’s best to use a snow alternative (like shaved ice).
Sustainable Snow Collection: When making snow ice cream, only take what you need to avoid waste. Nature will thank you!
Safer Alternatives for Warmer Climates
If you live in an area where fresh, clean snow isn’t an option, try these alternatives:
Crushed or Shaved Ice – Blend ice cubes into fine snow-like granules.
Frozen Coconut Milk – Scrape frozen coconut milk for a similar texture.
Blended Frozen Milk – Freeze milk or a dairy-free alternative in a thin layer, then scrape or blend for a snow-like consistency.
Final Tip: When in doubt, play it safe! If the snow doesn’t look clean, try an alternative. Your winter dessert will still be just as fun and delicious.
Why is my snow ice cream watery?
Chances are, you added too much liquid (we’ve all been there). Try these fixes:
Add more snow to thicken it up.
Mix gently—overmixing melts the snow faster.
Use cold ingredients—room temp milk melts the snow too quickly!
Can I make this without sweetened condensed milk?
Absolutely! Here are a few easy swaps:
- Regular milk + sugar (start with ½ cup milk and ¼ cup sugar, then adjust to taste)
- Evaporated milk + sugar for a richer flavor
- Non-dairy milk + maple syrup for a vegan snow ice cream option
How long does snow ice cream last?
It’s best eaten fresh (seriously, it melts fast!). But if you wish to keep it for later:
- Freeze it in an airtight container for up to 24 hours.
- Expect it to harden—let it sit at room temp for 10-15 minutes before scooping.
- Stir in a splash of milk to bring back that creamy texture.
Now that you know all the tricks to making perfect snow ice cream, what flavor will you try first? Let me know in the comments!
Let It Snow… Ice Cream!
So next time the snow starts falling, don’t just shovel it—scoop it into a bowl and make dessert! With just a few simple ingredients, you can turn a winter wonderland into a sweet, creamy treat that’s as fun to make as it is to eat.
Now it’s your turn! Have you tried this recipe? Feel free to share how it went in the comments below! Did you stick with classic vanilla or go wild with mix-ins? Share your favorite toppings!
Looking for more easy winter dessert recipes? Try these next:
No-Churn Vanilla Ice Cream – Just as easy, but no snow required!
Homemade Hot Chocolate – Perfect to pair with your snow ice cream.
Baked S’mores Dip – A warm, gooey treat for those extra chilly days.
Stay warm, stay creative, and most importantly—enjoy every bite!